Main menu
You are here
How to install a server role on a Server Core installation
How to install a server role on a Server Core installation
Yesterday I wrote a post on how to install and configure a new Server Core installation using the command prompt. In that article, I talked about setting an Administrator password, activating Server Core, renaming the computer, joining a Server Core machine to a domain, and turning on the firewall.
Now that you have done that, you probably want to start installing server roles, right? Windows Server 2008 Server Core supports the following server roles:
- Active Directory Domain Services (AD DS)
- Active Directory Lightweight Directory Services (AD LDS)
- DHCP Server
- DNS Server
- File Services
- Print Services
- Hyper-V
- Streaming Media Services
- Web Server (IIS)
There are a couple of things you need to understand before you start installing server roles in Server Core, otherwise you will be very confused!
- If you are configuring a Print Server, you will have to remotely configure the print server using the Print Management Console from a Windows Vista or Windows Server 2008 computer.
- If you are configuring a DHCP server, you must use a static IP address on the Server Core installation.
- On a Server Core install, you cannot use the dcpromo.exe wizard to promote or demote a domain controller. You have to create an unattend file and then use that with dcpromo. The best thing is to run dcpromo on another computer with Server 2008 and choose the option to save an unattend file.
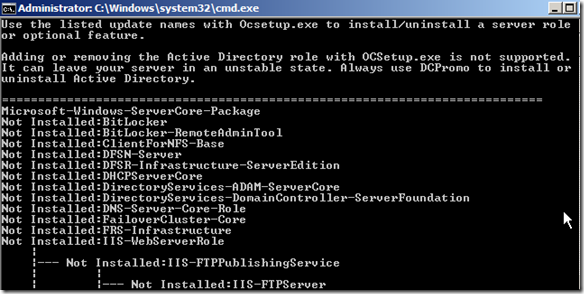
If you want to see a list of available server roles on Server Core, type the following command:
oclist
Now you can start installing the server roles you want. Here are the commands for some of the most common roles:
Install DNS Server Role:
start /w ocsetup DNS-Server-Core-Role
To configure a new DNS zone, you can use the dnscmd or you can create a zone remotely by using the DNS MMC snap-in from another computer.
Install DHCP Server Role:
start /w ocsetup DHCPServerCore
Again, use the DHCP MMC snap-in to remotely manage your DHCP scopes, etc. Note that the DHCP service will not start automatically, you have to type in the following command:
sc config dhcpserver start= auto
You can start the service for the first time by typing in:
net start dhcpserver
Install Hyper-V Server Role:
start /w ocsetup Microsoft-Hyper-V
To manage Hyper-V, you have to download the Hyper-V management tools onto a Vista or Server 2008 computer.
Install Print Server Role:
start /w ocsetup Printing-ServerCore-Role
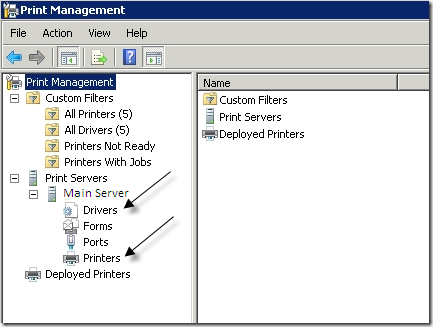
If you want to install a printer onto a Server Core Print Server, you have to open the Print Management console on another computer and add the server running Server Core.
Then expand the server and right-click Drivers and choose Add Driver. Install the print driver and then right-click Printers and choose Add Printer. Click Add a TCP/IP or Web Services printer by IP address or hostname and choose Next. Enter the IP address and click Next and Finish.
Install Active Directory Services Role:
dcpromo /unattend:<unattendfile>
Once you create an unattend file, enter the path in the above command. This will allow you to promote a server to domain controller or demote.
Install Web Server (IIS) Role:
start /w pkgmgr /iu:IIS-WebServerRole;WAS-WindowsActivationService;WAS-ProcessModel
This will install IIS on Windows Server 2008 with the default options. Finally, you can use Terminal Services to remotely log into a Server Core installation by typing in the following command:
cscript C:\Windows\System32\ Scregedit.wsf /ar 0
This will enable Remote Desktop administration to accept new incoming connections. You can then remotely log into the server by going to Start, Run and typing in mstsc from another computer.
That’s a quick overview of how to install server roles on Windows Server 2008 Server Core. If you have problems, post a comment! Enjoy!
source: helpdeskgeek


